Apache 1.3.27 のインストール

WWWサーバはなんと言っても Apache でしょう。 幸い WebminにもApacheを管理する仕組があります。


Apacheをインストール

  1. Apacheサイト から最新版の apache_1.3.27.tar.gz をダウンロードして /usr/local/src ディレクトリに入れます。

  2. カレントディレクトリを /usr/local/src にし、次のコマンドを実行します。
          # tar xvzf apache_1.3.27.tar.gz
          # cd apache_1.3.27
          # ./configure
          # make
          # make install
    
    これで Apacheのインストールは完了です。


WebminからApacheを管理

WebminからApacheサーバを管理できるように設定します。

  1. Apache Webserver
    Webmin から サーバ をクリックし、そこに表示される Apache Webserver アイコンをクリックします。
  2. モジュール設定
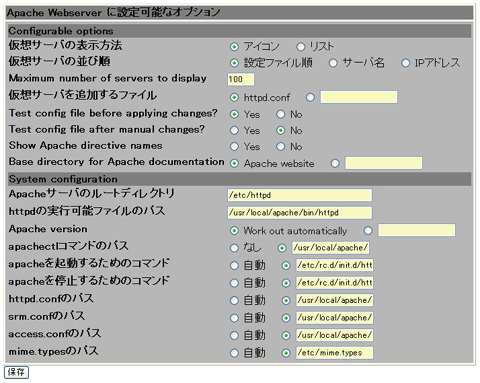
    モジュール設定 をクリックするとこのような画面が表示されるので、設定内容はこの通りに入力して 保存 をクリックします。

    • Apacheサーバのルートディレクトリ : /etc/httpd
    • httpdの実行可能ファイルのパス : /usr/local/apache/bin/httpd
    • apachectlコマンドのパス : /usr/local/apache/bin/apachctl
    • apacheを起動するためのコマンド : /etc/rc.d/init.d/httpd start
    • apacheを停止するためのコマンド : /etc/rc.d/init.d/httpd stop
    • httpd.confのパス : /usr/local/apache/conf/httpd.conf
    • srm.confのパス : /usr/local/apache/conf/srm.conf
    • access.confのパス : /usr/local/apache/conf/access.conf
    • mime.typesのパス : /etc/mime.types


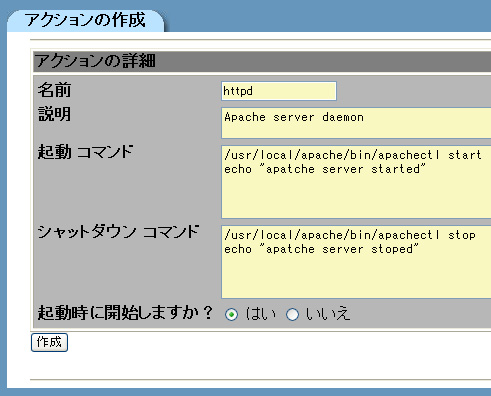
  3. システム / 起動およびシャットダウン にある 新規の起動またはシャットダウン アクションを作成 をクリックして Apache用の アクションの詳細 を作成します。
    設定を左の画像のように設定します。 この設定で /etc/rc.d/init.d/ ディレクトリに httpd という名前のスクリプトが作成され、/etc/rc.d/rc*.d/ ディレクトリに「Sなんたら」とか「Kなんたら」いう Linux特有の起動/停止記述もしてくれます。 この辺り、Webminは楽です。

    そして 作成 をクリックします。 これで完了です。 Apacheは次のブートからは自動起動するようになっています。

  4. manコマンドで Apacheのマニュアルを参照できるよう /etc/man.config MANPATH /usr/local/apache/man の行を追加します。
          # cat /etc/man.config
          
          # This file is also read by man in order to find how to call nroff, less, etc.,
          # and to determine the correspondence between extensions and decompressors.
          #
          # MANBIN                /usr/local/bin/man
          #
          # Every automatically generated MANPATH includes these fields
          #
          MANPATH /usr/man
          MANPATH /usr/local/man
          MANPATH /usr/X11R6/man
          MANPATH /usr/lib/perl5/man
          MANPATH /usr/local/apache/man
    
  5. 以上でもう Apacheは動作しています。 Webminを使うとラクチン・ラクチンです。 クライアントパソコンのブラウザから http://192.168.1.210/ としてアクセスしてみて動作を確認します。 (192.168.1.210 は今回インストール中のサーバの IPアドレスです。)


UserDirディレクティブの設定

  1. ユーザがホームページを公開できるよう、UserDirディレクティブを設定します。 ここでは以下の方針で設定します。

  2. 以上の方針に基づき、 /usr/local/apache/conf/httpd.conf # Control access to UserDir directories. で始まる設定部分を変更・追加します。 以下がその設定した内容です。 <Directory /home/*/public_html>・・・</Directory> を先に記述し <Directory /home/hiroshi/public_html>・・・</Directory> を後に記述します。 これを逆にすると特定ユーザでも SSIとCGI実行ができなくなります。
    #
    # Control access to UserDir directories.  The following is an example
    # for a site where these directories are restricted to read-only.
    #
    <Directory /home/*/public_html>
        AllowOverride FileInfo AuthConfig Limit
        Options MultiViews Indexes SymLinksIfOwnerMatch
        <Limit GET POST OPTIONS PROPFIND>
            Order allow,deny
            Allow from all
        </Limit>
        <LimitExcept GET POST OPTIONS PROPFIND>
            Order deny,allow
            Deny from all
        </LimitExcept>
    </Directory>
    
    <Directory "/home/hiroshi/public_html">
        AllowOverride FileInfo AuthConfig Limit
        Options MultiViews SymLinksIfOwnerMatch Includes ExecCGI
        <Limit GET POST OPTIONS PROPFIND>
            Order allow,deny
            Allow from all
        </Limit>
        <LimitExcept GET POST OPTIONS PROPFIND>
            Order deny,allow
            Deny from all
        </LimitExcept>
    </Directory>
    
    設定にある Options のパラメータの意味は次の通りです。
  3. 特定ユーザでの CGI実行が可能になるよう AddHandler の項目を追加します。 /usr/local/apache/conf/httpd.conf # To use CGI scripts: で始まる設定部分を変更・追加します。 以下がその設定した内容です。
        #
        # AddHandler allows you to map certain file extensions to "handlers",
        # actions unrelated to filetype. These can be either built into the server
        # or added with the Action command (see below)
        #
        # If you want to use server side includes, or CGI outside
        # ScriptAliased directories, uncomment the following lines.
        #
        # To use CGI scripts:
        #
        AddHandler cgi-script .cgi
        AddHandler cgi-script .pl
    
  4. 特定ユーザでの SSIとCGI実行ファイルの定義を記述します。 AddType AddHandler の項目を追加します。 /usr/local/apache/conf/httpd.conf # To use server-parsed HTML files で始まる設定部分を変更・追加します。 以下がその設定した内容です。
        #
        # To use server-parsed HTML files
        #
        AddType text/html .shtml
        AddType text/html .html
        AddHandler server-parsed .shtml
        AddHandler server-parsed .html
    
  5. 以上で設定は完了です。 方針通りの動作をするかチェックします。


代表サイトページ=特定ユーザページ に設定

http://192.168.1.210/ で表示される内容と http://192.168.1.210/~hiroshi/ が全く同じページに見えるように設定します。 こうすることにより、代表サイトページを特定ユーザの権限でメンテナンスすることができます。 http://192.168.1.210/~hiroshi/ が本物で http://192.168.1.210/ がエイリアスという訳です。

  1. 次のコマンドを実行して、元々あった htdocsディレクトリを htdocs_oldにディレクトリ名変更します。 そして、/home/hiroshi/public_htmlディレクリを /usr/local/apache/htdocsディレクトリにソフトリンクします。
         # cd /usr/local/apache
         # mv htdocs/ htdocs_old/
         # ln -s /home/hiroshi/public_html/ htdocs/
    
  2. これだけでは http://192.168.1.210/ で SSIとCGIが実行できないので、以下のように /usr/local/apache/conf/httpd.conf の記述を変更します。 条件は http://192.168.1.210/~hiroshi/ に与えるディレクティブ設定と同じです。
         # This may also be "None", "All", or any combination of "Indexes",
         # "Includes", "FollowSymLinks", "ExecCGI", or "MultiViews".
         #
         # Note that "MultiViews" must be named *explicitly* --- "Options All"
         # doesn't give it to you.
         #
             Options MultiViews SymLinksIfOwnerMatch Includes ExecCGI
    
  3. 以上で完了です。